
Uploading and accessing data on Data Central Cloud
Data Central provides access to our Cloud data hosting via WebDAV. WebDAV is a standard protocol, with many different clients (the software you run on your laptop, desktop or even phone or tablet).
We have two suggestions for clients (if you do not have a preferred one): the OwnCloud desktop client, which provides a Dropbox-like UI; and rclone, which is much more like rsync.
Connecting to Data Central Cloud using OwnCloud desktop client
Download and install the OwnCloud desktop client from https://owncloud.com/desktop-app/.
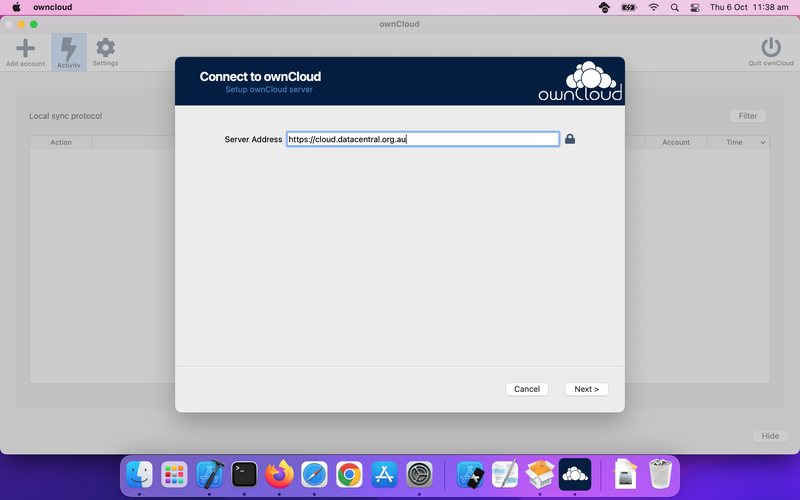
Once you start up the app, it will ask you to enter the URL of the service to connect to. Enter "https://cloud.datacentral.org.au" as that URL.
Once that happens, you will be directed to the Data Central Cloud web interface to log in. Once you log in with your Data Central account details, then you will be given the option of controlling what to sync.

We recommend choosing "Manually create folder sync connections", as while the default allows you to filter folders out, if you are in multiple research groups, you will have access to a number of shared folders, and you may find the amount of data that you have access to exceeds the space you have on your device.
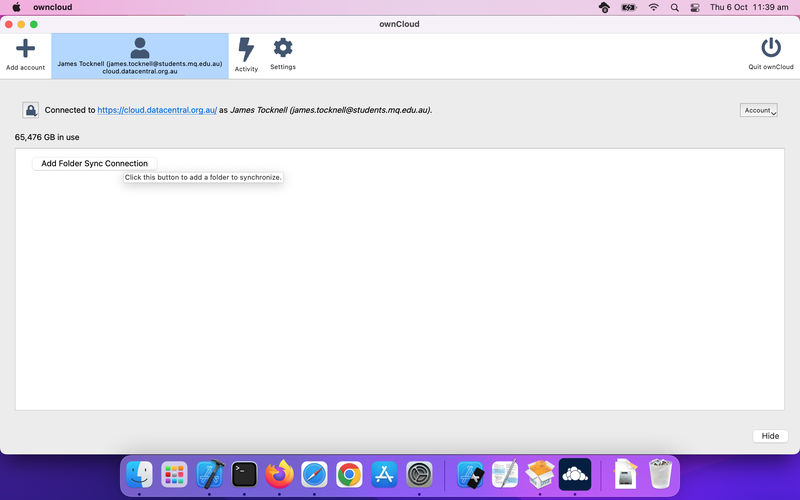
Once you've chosen the your sync configuration, then if you done what we suggested above, then click the "Add Folder Sync Connection" button to start adding folders to sync between your device and Data Central Cloud.
Connecting to Data Central Cloud via WebDAV
First, go to https://cloud.datacentral.org.au/, and log in with your Data Central username and password. You will see a screen similar to the one below:
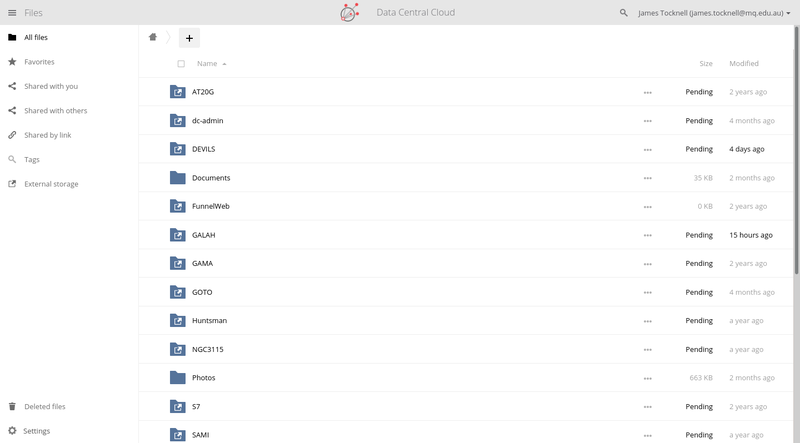
You should see two folders: "Documents" and "Photos"; and a PDF: "ownCloud Manual.pdf"; plus links to team data for any teams you have access to. You can create additional folders and upload and download files using the web interface, but if you have many files, using WebDAV is much faster and less error prone.
Copy the URL pointed to by the arrow below, this is your WebDAV URL:
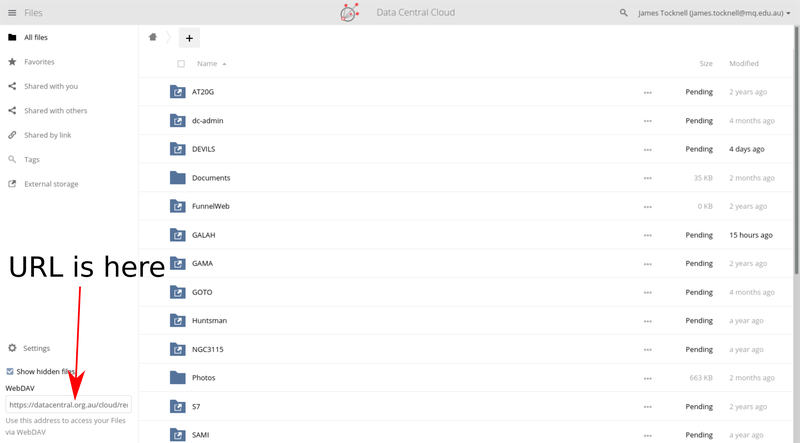
This URL tells the different WebDAV clients where to look for Data Central Cloud. You do not need to give others this URL: for files/folders within your account, you can share them via the web interface; for data within the team area, other members of your team will be able to access it in their account. Make sure the URL starts with "https://"—if it does not, add the extra "s".
In addition to the URL, you will need to create an app password. Click your username in the top right-hand side, and click "Settings". This takes you to your user settings. Click "Security", and then scroll down to "App passwords / tokens". Add an name for the software you are connecting—we suggest something like "<name of app> on <name of computer>" to make it easy to find the correct password—then click "Create new app passcode".
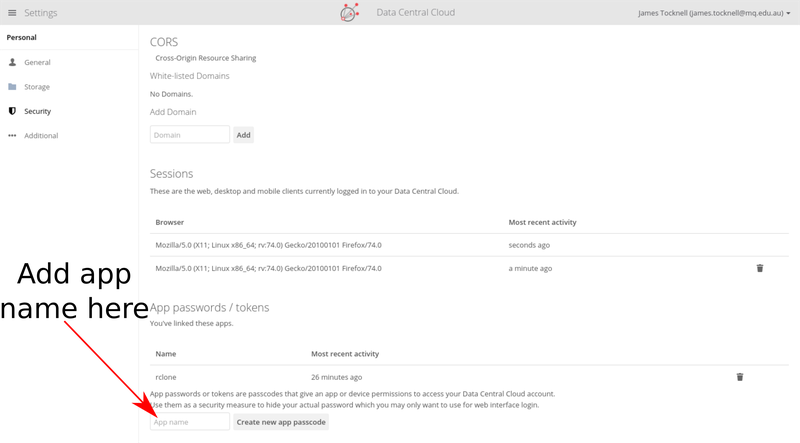
Data Central Cloud will only show the password once, but you can always delete the app password and create a new one. We strongly recommend creating a new app password for every different app/computer you use—this means you do not need to note down the password anywhere.
Now that you have your URL and app password, you can enter these details, plus your Data Central username into whichever piece of software you wish to use to access Data Central Cloud.
Using rclone to connect to Data Central Cloud
There are instructions at https://rclone.org/webdav/#owncloud which cover how to connect up rclone to WebDAV. A quick summary is you type:
$ rclone configto open the rclone config tool. The prompts should be self-explanatory, but here's the output from a session where I configure rclone for the first time.
$ rclone config
2020/04/03 12:23:51 NOTICE: Config file "/home/aragilar/.config/rclone/rclone.conf" not found - using defaults
No remotes found - make a new one
n) New remote
s) Set configuration password
q) Quit config
n/s/q> n
name> dccloud
Type of storage to configure.
Enter a string value. Press Enter for the default ("").
Choose a number from below, or type in your own value
 1 / 1Fichier
   \ "fichier"
 2 / Alias for an existing remote
   \ "alias"
 3 / Amazon Drive
   \ "amazon cloud drive"
 4 / Amazon S3 Compliant Storage Provider (AWS, Alibaba, Ceph, Digital Ocean, Dreamhost, IBM COS, Minio, etc)
   \ "s3"
 5 / Backblaze B2
   \ "b2"
 6 / Box
   \ "box"
 7 / Cache a remote
   \ "cache"
 8 / Citrix Sharefile
   \ "sharefile"
 9 / Dropbox
   \ "dropbox"
10 / Encrypt/Decrypt a remote
   \ "crypt"
11 / FTP Connection
   \ "ftp"
12 / Google Cloud Storage (this is not Google Drive)
   \ "google cloud storage"
13 / Google Drive
   \ "drive"
14 / Google Photos
   \ "google photos"
15 / Hubic
   \ "hubic"
16 / JottaCloud
   \ "jottacloud"
17 / Koofr
   \ "koofr"
18 / Local Disk
   \ "local"
19 / Mail.ru Cloud
   \ "mailru"
20 / Microsoft Azure Blob Storage
   \ "azureblob"
21 / Microsoft OneDrive
   \ "onedrive"
22 / OpenDrive
   \ "opendrive"
23 / Openstack Swift (Rackspace Cloud Files, Memset Memstore, OVH)
   \ "swift"
24 / Pcloud
   \ "pcloud"
25 / Put.io
   \ "putio"
26 / SSH/SFTP Connection
   \ "sftp"
27 / Transparently chunk/split large files
   \ "chunker"
28 / Union merges the contents of several remotes
   \ "union"
29 / Webdav
   \ "webdav"
30 / Yandex Disk
   \ "yandex"
31 / http Connection
   \ "http"
32 / premiumize.me
   \ "premiumizeme"
Storage> webdav
** See help for webdav backend at: https://rclone.org/webdav/ **

URL of http host to connect to
Enter a string value. Press Enter for the default ("").
Choose a number from below, or type in your own value
 1 / Connect to example.com
   \ "https://example.com"
url> https://cloud.datacentral.org.au/remote.php/dav/files/jtocknell/
Name of the Webdav site/service/software you are using
Enter a string value. Press Enter for the default ("").
Choose a number from below, or type in your own value
 1 / Nextcloud
   \ "nextcloud"
 2 / Owncloud
   \ "owncloud"
 3 / Sharepoint
   \ "sharepoint"
 4 / Other site/service or software
   \ "other"
vendor> owncloud
User name
Enter a string value. Press Enter for the default ("").
user> jtocknell
Password.
y) Yes type in my own password
g) Generate random password
n) No leave this optional password blank
y/g/n> y
Enter the password:
password:
Confirm the password:
password:
Bearer token instead of user/pass (eg a Macaroon)
Enter a string value. Press Enter for the default ("").
bearer_token>
Edit advanced config? (y/n)
y) Yes
n) No
y/n> n
Remote config
--------------------
[dccloud]
url = https://cloud.datacentral.org.au/remote.php/dav/files/jtocknell/
vendor = owncloud
user = jtocknell
pass = *** ENCRYPTED ***
--------------------
y) Yes this is OK
e) Edit this remote
d) Delete this remote
y/e/d> y
Current remotes:

Name                 Type
====                 ====
dccloud              webdav

e) Edit existing remote
n) New remote
d) Delete remote
r) Rename remote
c) Copy remote
s) Set configuration password
q) Quit config
e/n/d/r/c/s/q> q
Once you have configured rclone, you can use the rclone command to browse and access data. Tab completion should work, and different remotes are specified via "<remote>:<path>", similar to scp. rclone documents all its commands at https://rclone.org/docs/#subcommands, but they are similar to the normal shell commands.